How to chase storms?
Published on 2023-08-30
Introduction
Chasing storms is definitely one of the more demanding hobbies. In addition to the obvious increased risk of getting struck by a stray lightning bolt, there are other negative aspects such as fuel costs, the time required to travel to observation spots, and countless hours spent analyzing forecasts and monitoring weather conditions.
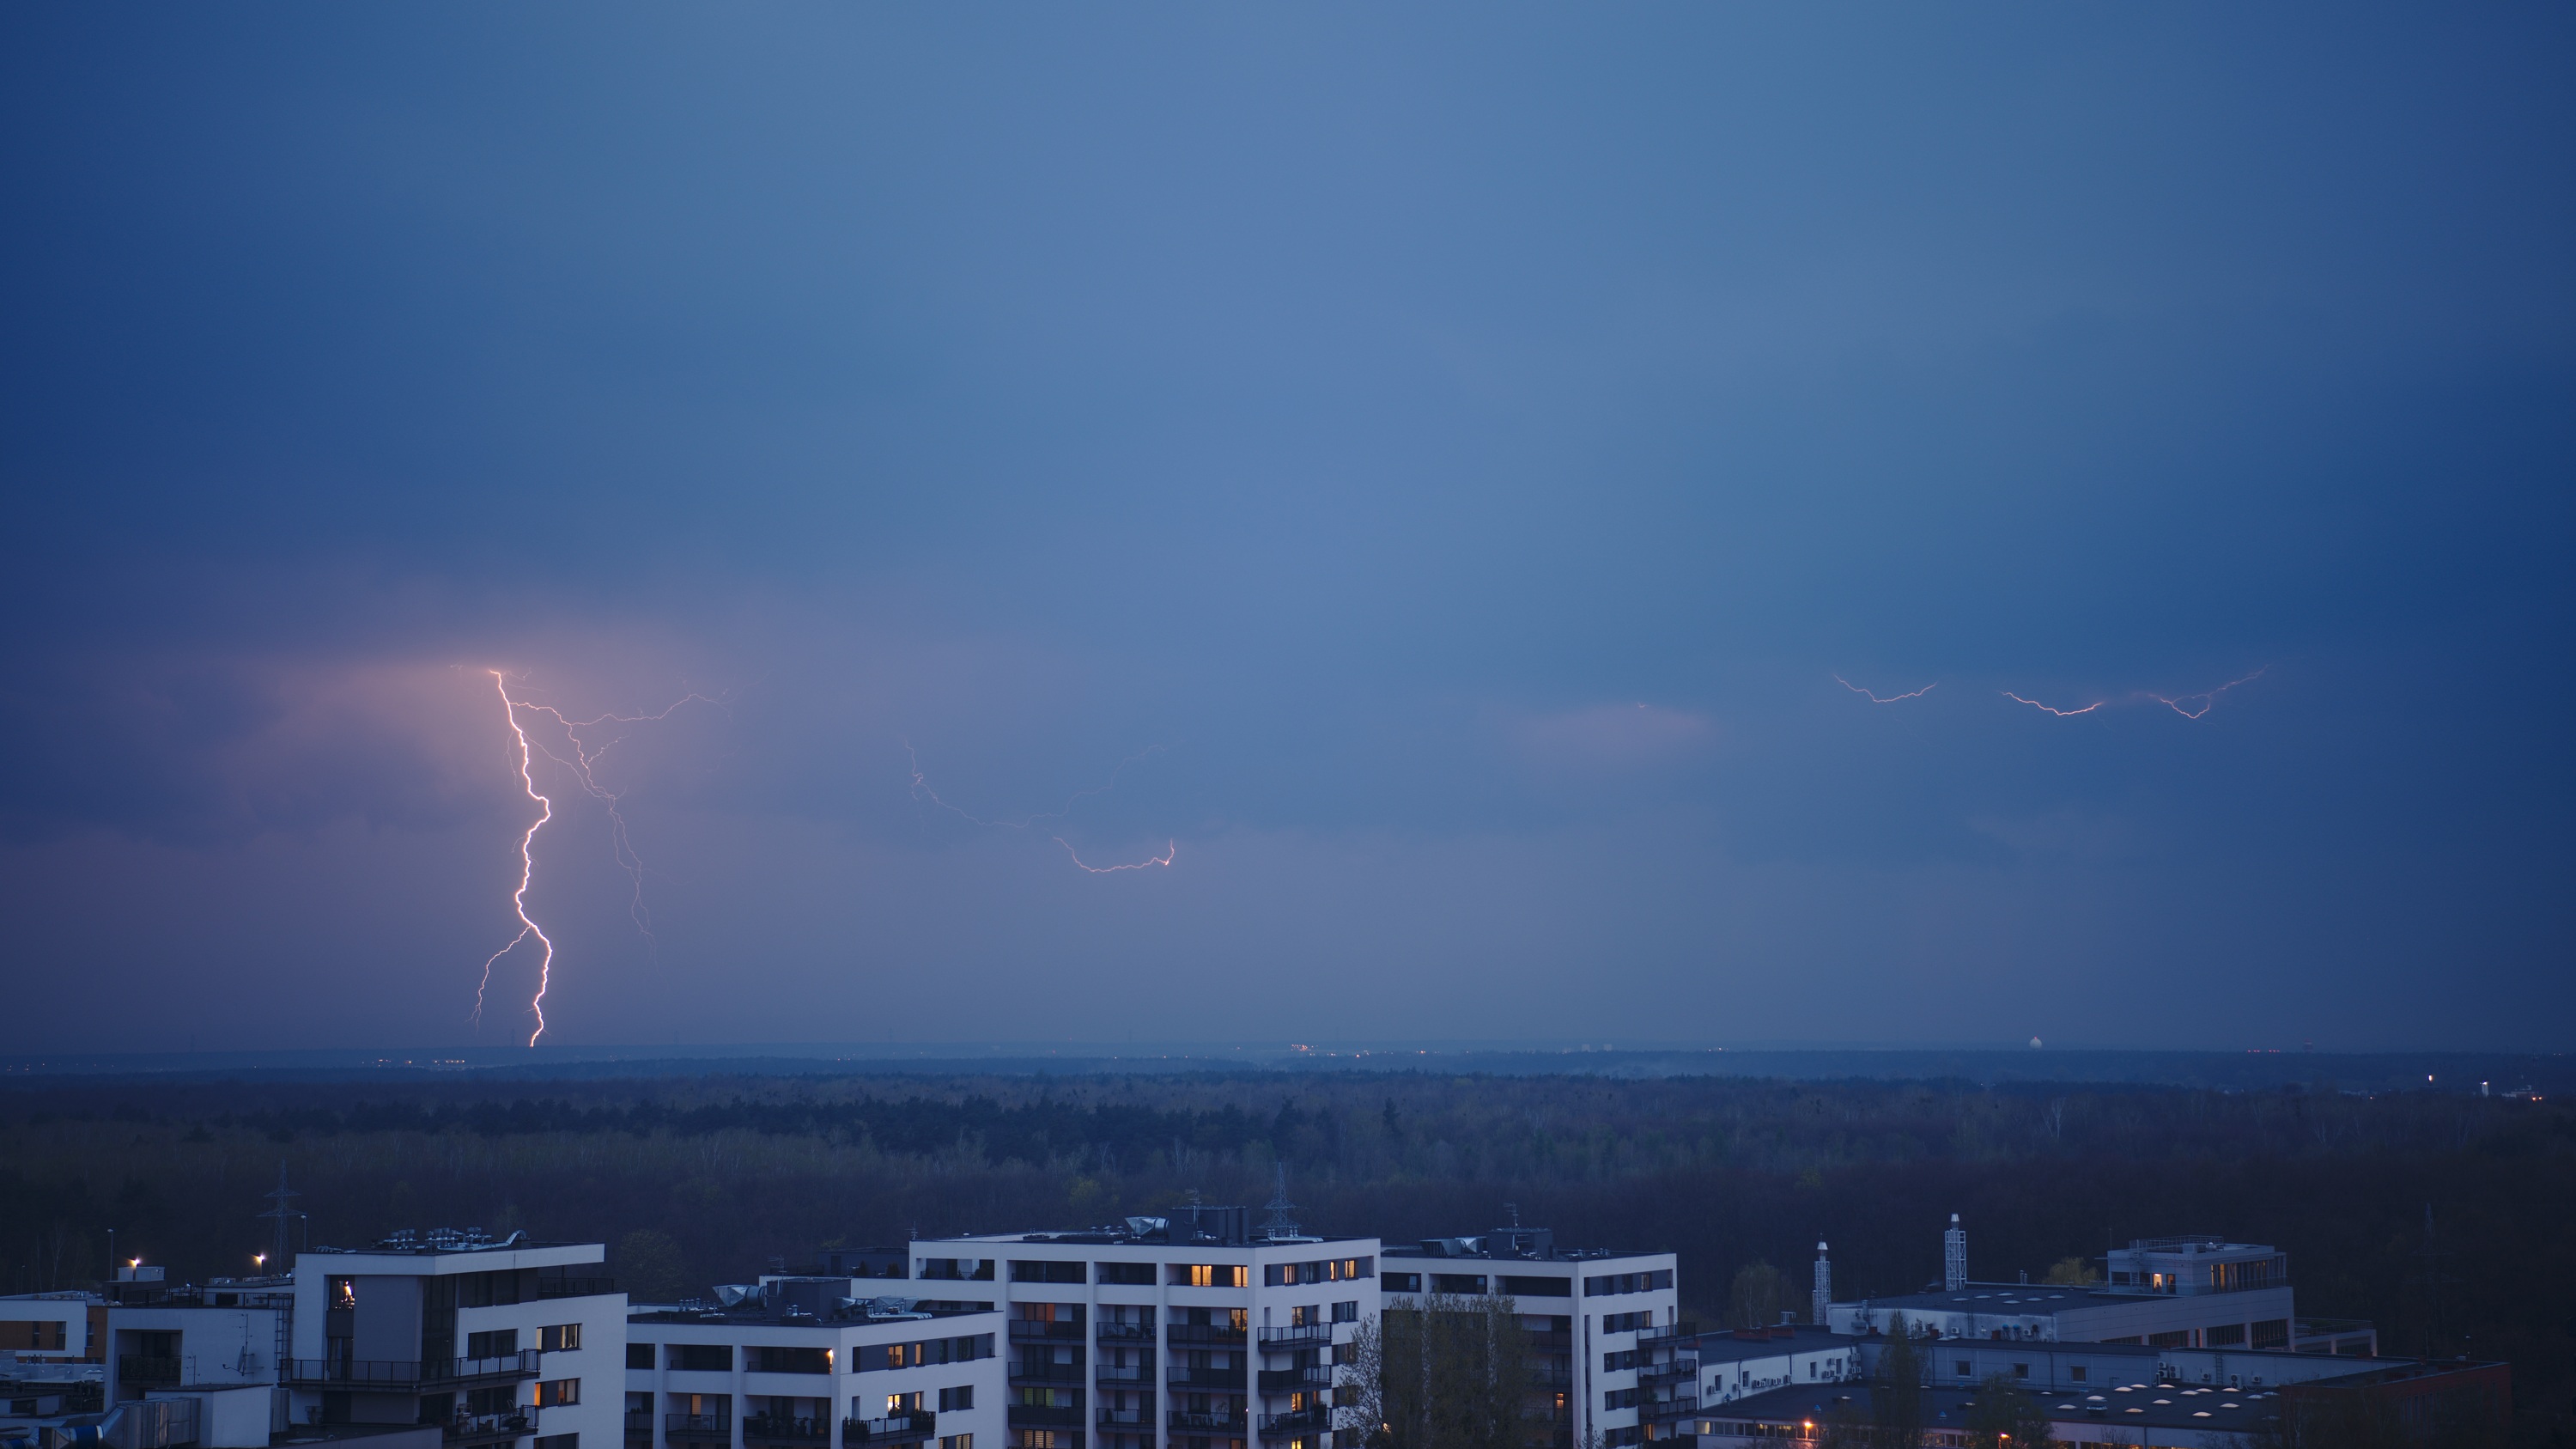
Nevertheless, when we finally arrive at our chosen observation spot and the first flashes light up the sky – now that's a sight to behold! The satisfaction and sense of accomplishment immediately outweigh all the struggles that we've faced. In the following sections, I'll share some tips on how to kick off our journey of chasing these extraordinary phenomena :)
Required gear
For those who appreciate specifics, let me first briefly introduce my regular expedition gear, and then we'll delve into each item in more detail. Each trip features:
- A car
- Two mirrorless camera bodies
- A 14-24 mm f/2.8 lens and a 24-100 mm f/4 lens
- Two photographic tripods
- Some spacious memory cards
- Camera cleaning kit and extra batteries
- Warm clothing, waterproof jacket
- Snacks, water
- A laptop; a laptop car mount; a laptop car charger; a GPS antenna
When it comes to getting around, a car is definitely the way to go. It gives us a double advantage: a reliable way to reach our observation spot in a reasonable amount of time, and a protection from lightning strikes (the car acts like a Faraday cage). Plus, if we're lucky enough to have a spacious trunk, we can even use the trunk lid as a makeshift rain cover for our cameras. I stumbled upon this trick fairly recently, and I have to admit, it works remarkably well.
When it comes to the equipment we use for photography, some people can get by with just their smartphones, but for my needs, I prefer using a mirrorless camera with a full-frame sensor, and that's what this guide will focus on. Of course, DSLRs and other types of cameras will also do the job. To have the versatility to frame in multiple ways, I usually try to bring along two cameras with me.
When it comes to lenses, it all depends. My go-to choice is usually a wide-angle 14mm lens because I believe it's best to capture as much of the sky as possible and not miss any lightning strikes. However, it's not always the best option - it largely depends on the distance of the storm from us and where the bulk of the action is happening in the sky. There's no point in having a wide frame if the lightning only fills, say, 3% of the image, right? That's why I also make sure to bring a lens with a narrower focal length. In my experience, these lenses don't need to be super bright either; in fact, I rarely go wider than f/4. The important thing to remember is that the wider the aperture, the narrower the field of view, and for these types of shots, we usually want everything to be sharp and in focus.
When it suddenly gets chilly, and it happens quite often with storms, having some warm clothes on hand is super useful. It may not be a big deal while we're driving because we've got air conditioning to keep us cozy. But when we make stops, that's a whole different story, and it's definitely worth taking care of ourselves by bundling up.
We'll talk about the laptop in a separate section. The remaining items on the list are pretty self-explanatory :)
Forecasting
Unfortunately, currently there are no surefire ways to predict if and when a storm will occur in a specific region. It's a highly unpredictable phenomenon, which is why it's important to understand that it's all about probabilities and chances.
To make any kind of plan, it's essential to visualize information on a map. In my opinion, this type of forecast makes sense for up to 2 or 3 days ahead; anything beyond that is just pure guesswork and not worth relying on. Tracking current weather conditions, on the other hand, is a different story. In this case, science offers various technological advancements that are much more reliable than the current forecasting algorithms:
- Doppler radar, which allows us to accurately measure current rainfall. It operates by using electromagnetic waves that are sent out around the radar. These waves bounce off water or ice droplets in the clouds and then return to the radar. The radar measures the frequency changes of these waves, according to the Doppler effect, which helps determine the location of the raindrops and the speed at which they are moving.
- Satellites, which help us assess the current cloud cover. They work their magic even at night by continuing the observations in the infrared spectrum.
- Last but definitely not leas, the Blitzortung meteorological network, which, with the help of detectors that analyze electromagnetic field disruptions, can locate current lightning strikes in nearly real-time.
Here's a compilation of renowned services providing access to radars and a variety of forecasts that I know of:
- https://windy.com/ (definitely recommend this one)
- Monitor Burzowy Pro (Android, Poland only)
- https://lightningmaps.org/
- https://map.blitzortung.org/
- https://www.weatheronline.in/
- https://sat24.com/
Comparison of various services:
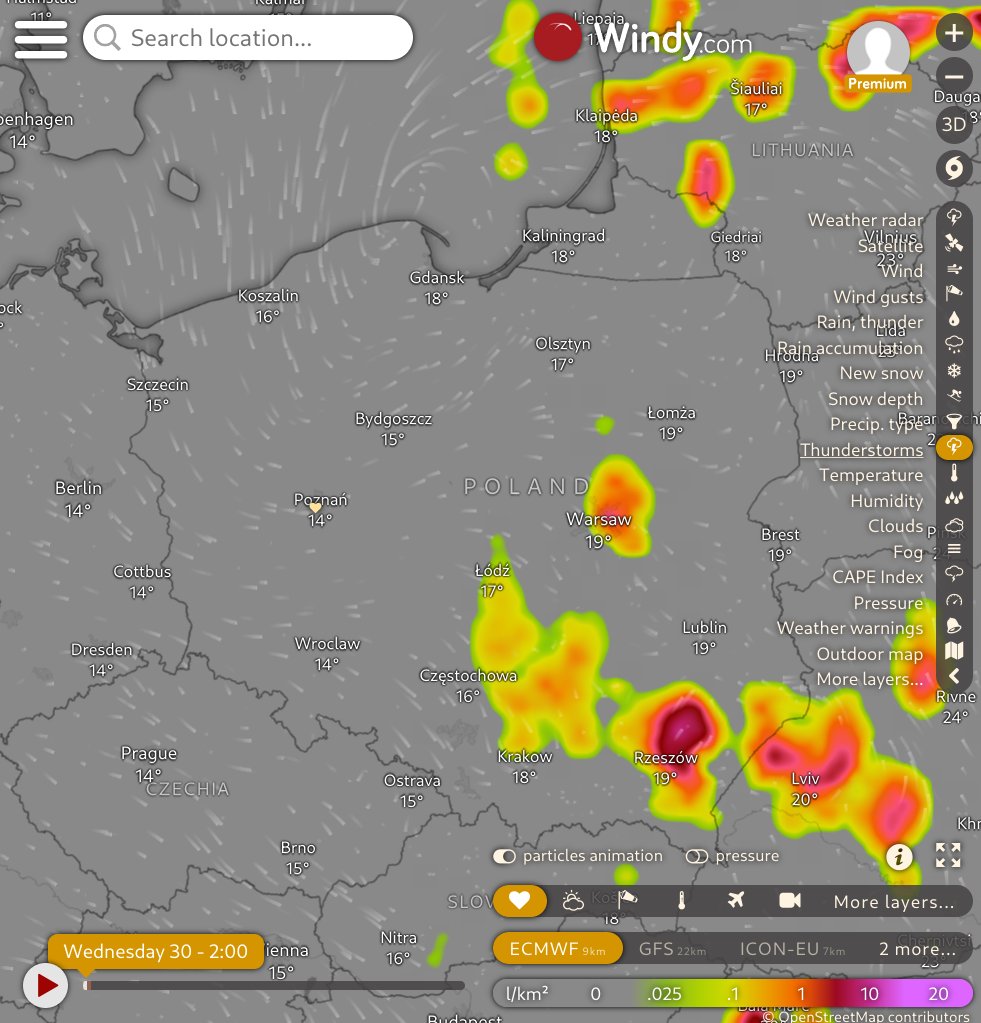
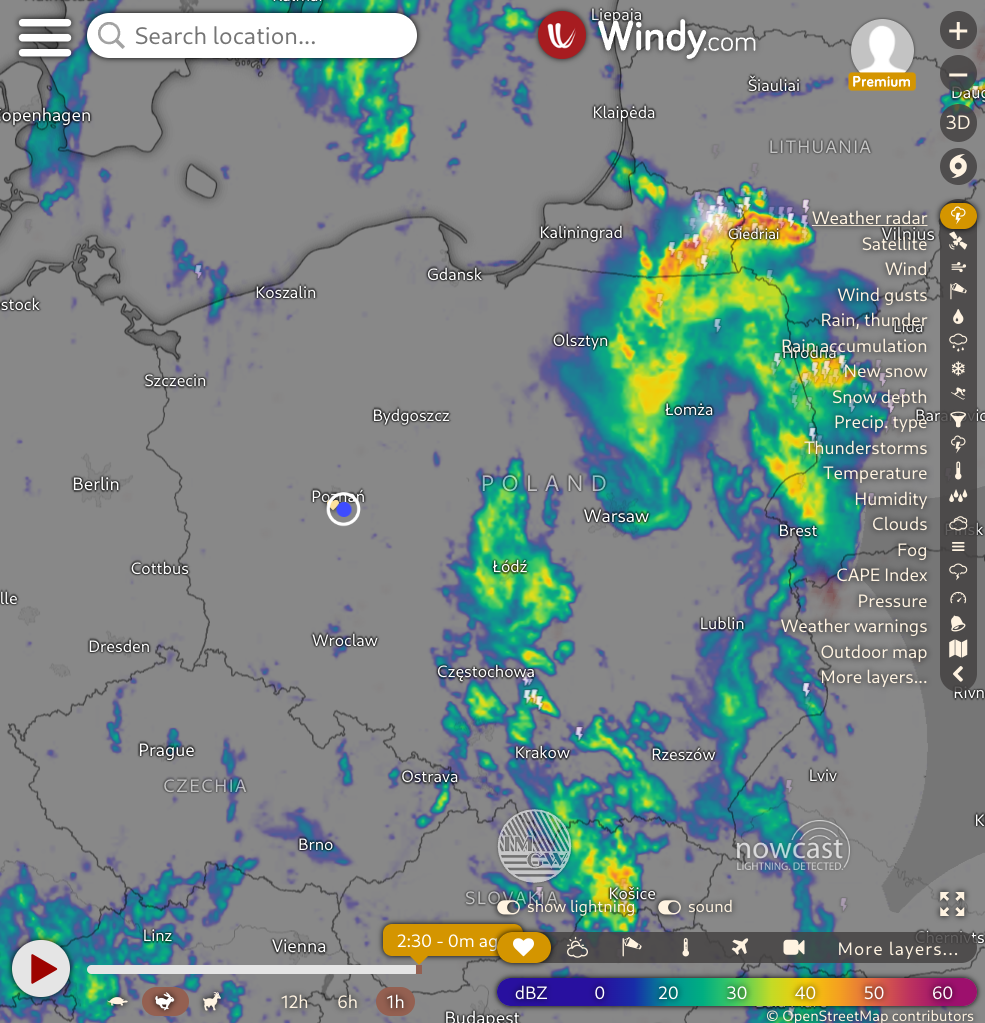
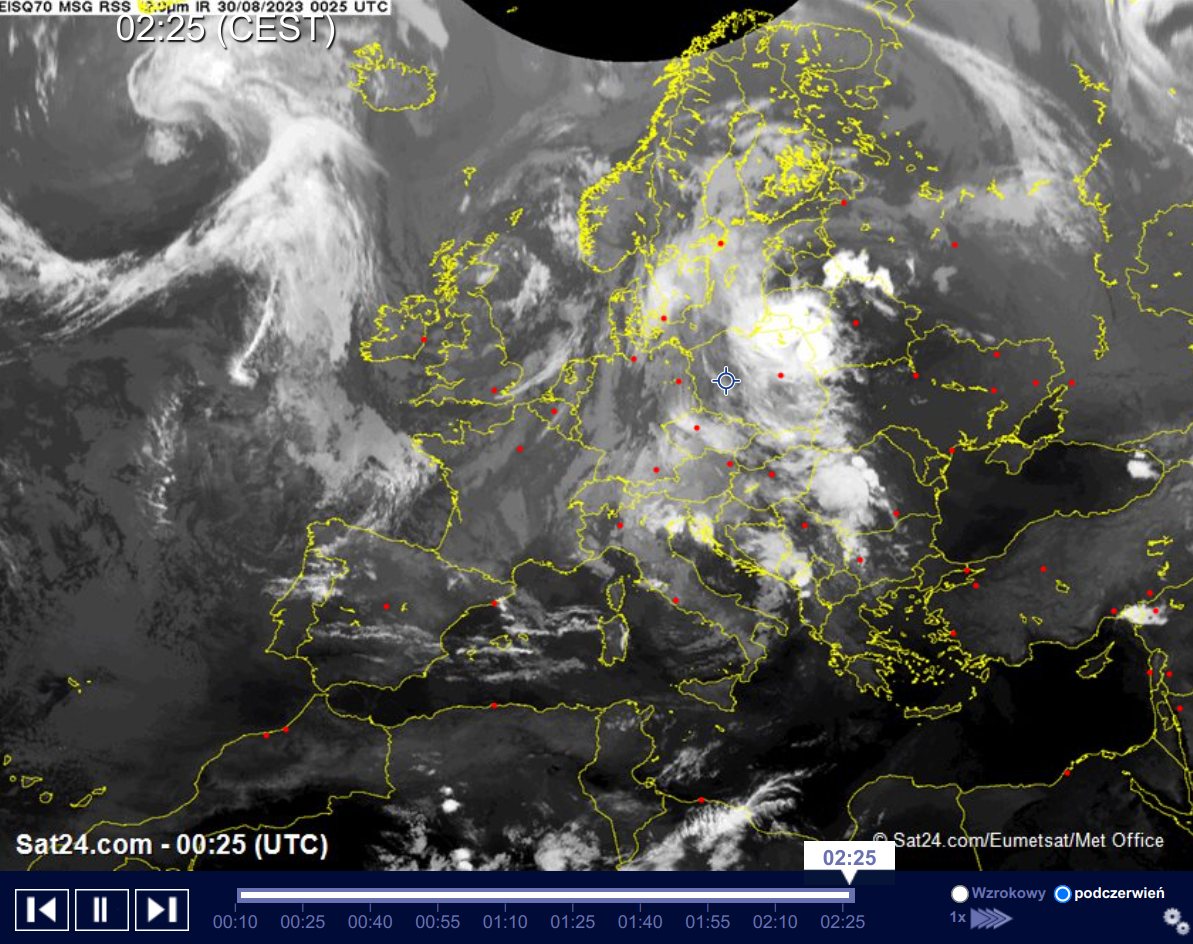
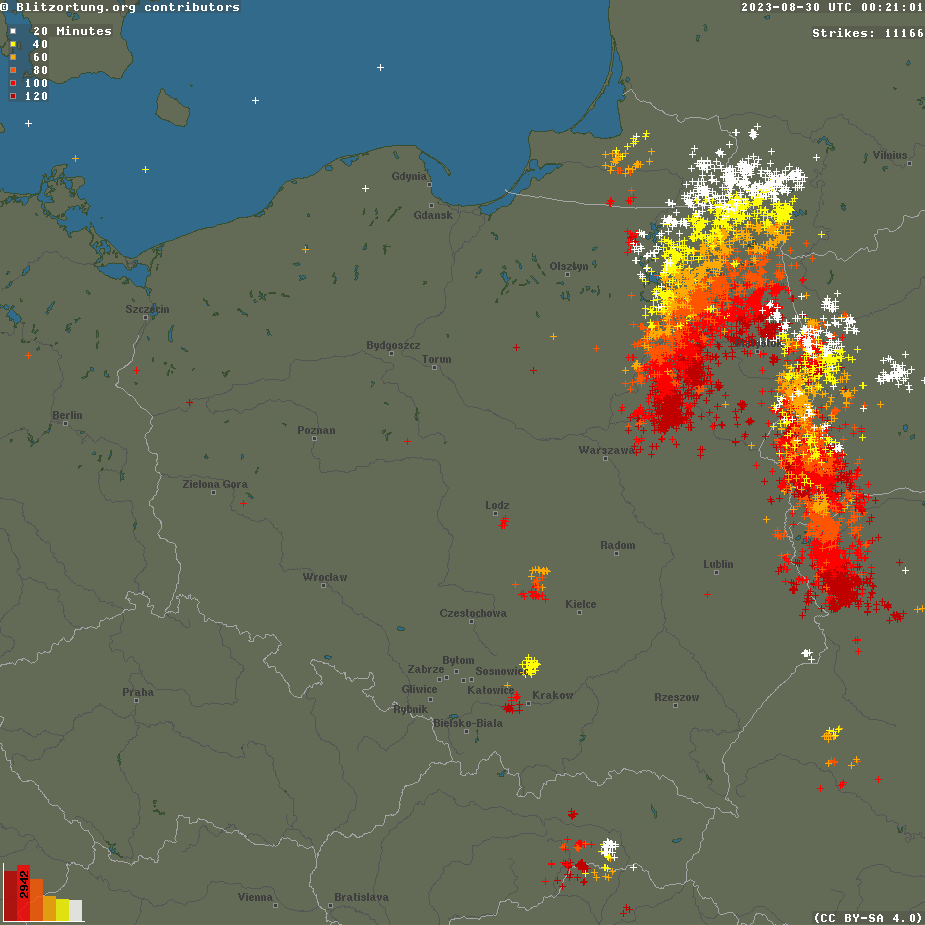
I use the long-term forecast to plan my day and get a rough idea of the area to watch out for, with an accuracy of about 50-100 km. On the day itself, I keep an eye on the windy.com and blitzortung.org radars to see how the weather is developing and check the direction of precipitation and lightning. This helps me make the final call on which way to go for my trip.
Driving technique
The things I'll be talking about in this section are from the viewpoint of someone living in the Greater Poland Voivodeship, which is a low-lying and fairly flat area. I can only imagine that the advice would be totally different for people living in the mountains or by the coast.
In previous seasons, my adventures were pretty straightforward. I would drive to pre-selected spots and wait for the weather to unfold. I chose these locations using Google Maps satellite view, prioritizing highly photogenic spots that offered my favorite kind of view: a flat horizon without trees or buildings, with the added bonus of a convenient parking spot alongside the road. Naturally, these places are typically found in the most remote and secluded areas of our country.
Looking back, I can confidently say that venturing into such remote areas may not be the best idea. I can't even count how many times the following scenario happened to me: I would drive over 100 km to a spot where Windy showed some intense purple splotches (indicating some real serious business), arrive there on time, park my car. Just when I felt safe and ready, I would reach for my phone to check the radars, and what do you know? The storm either struck somewhere completely different or didn't show up at all. This would mean I obviously ought to change my location. But being away from the main roads, it takes forever to get anywhere else.
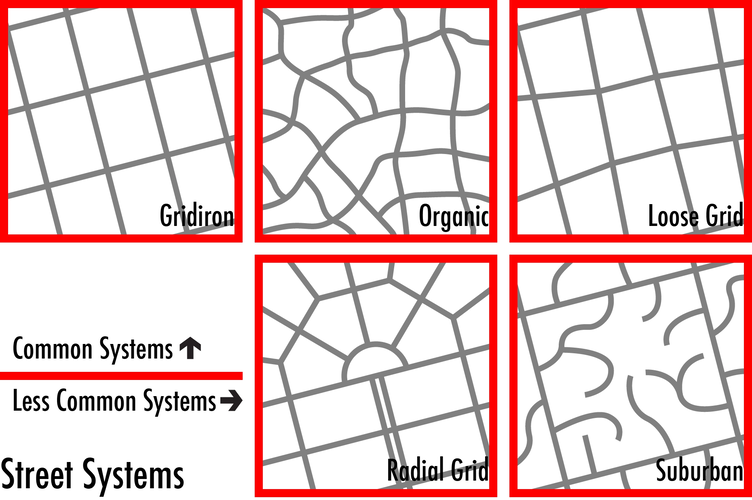
This is the moment when I envy Americans for their grid-based road system – getting anywhere is so predictable in terms of both directions and time. Us folks in Poland, with our more organic road system, have to find our own way around differently.
To avoid getting stuck in a situation like the one I mentioned earlier, there are a couple of things we can do:
- Instead of planning the perfect spot for a specific forecast or day, take some time to scout the area near main roads (expressways, highways) during calm weather and select a few reliable locations. It's better to be a bit further away but more mobile than being close but having slim chances of seeing anything.
- Don't set your sights on any specific location and just go with the flow, while still sticking to main roads. Only exit at places where it makes sense to do so.
I've been opting for the second solution for a while now, and I must say, it's working out well so far. The cool thing is that over time, we naturally start picking up the same knowledge as we would with the first approach.
Honestly, it's best to have a partner who's willing to join us on the chase, checking the radar or taking turns driving. It makes tackling the challenges of travel, planning, and adjusting the route a lot easier. But finding someone like that, who's just as crazy about storm chasing as we are, is often easier said than done. (If there's anyone from Poznań who's keen on joining forces for some epic hunts, hit me up! ;)
Another solution is to equip yourself with a laptop and keep an eye on live radar on its screen, while using a separate device as your main navigation (whether it's a phone or a car's onboard computer). It works best when combined with a voice assistant in your main navigation system. So, when you glance at the radar and see a storm approaching Farawayton, you can quickly say, "navigate to Farawayton," and the navigation will guide you through the shortest possible route. Once you're in Farawayton, you can then take a bit more time to choose the perfect observation spot outside the town. Additional tips for this driving method include:
- Most laptops available on the market do not come equipped with a WWAN card or GPS receiver, so purchasing a GPS antenna may be necessary to accurately display your location. I recommend UBlox's USB interface antennas – they may not work that well indoors, but they easily find my location within seconds when I'm in a car, and they can maintain the connection flawlessly afterwards.
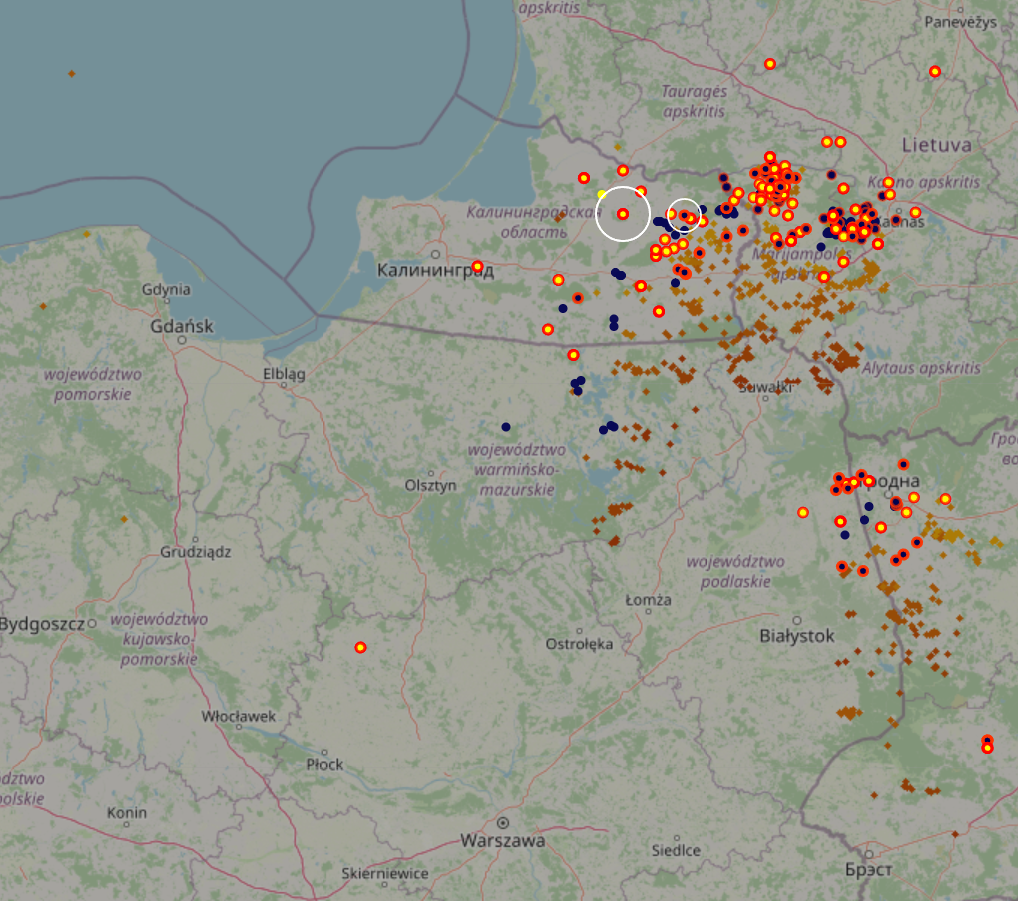
- The best publicly available radar that I know of is https://lightningmaps.org, and secondly, https://map.blitzortung.org. Both of these maps allow you to track your location and show lightning strikes with a few seconds of delay.
- Another helpful practice is to set your main car navigation system to have the north always facing up. This makes it easier to consolidate information from multiple maps in your mind without the need to mentally rotate reference points.
- It's also handy to have one of the monitors showing us a satellite view of the area. That way, we'll know beforehand whether we're going to a town in the middle of a forest, where we won't see anything, or to an open space.
If visibility allows, it's also good to visually monitor the area for rain and clouds, and compare the information from radars with our own observations.
A laptop is not necessary, but it certainly makes things a lot easier. Alternatively, you can ditch the navigation and rely solely on the radar on your phone, but that requires a good knowledge of the road network in the area :) I strongly advise against messing with your phone while driving or pulling over on the shoulders of expressways and highways – that's illegal and in general, it's just asking for trouble.
Photographing technique
Typically a lightning strike is visible for a moment, so it's best to forget about trying to snap pictures of it by hand. It's not impossible, since there's often a second flash after the initial one, which gives you a bit more time to capture it, but it just adds stress and leaves you wondering if you caught it in time. I'd also steer clear of gadgets like flash detectors because they also trigger the shutter too late. Luckily, there are some simple techniques that can help.
Parameters
First, we switch our camera to manual mode so that we're in control of the exposure time, aperture, and ISO sensitivity.
The main idea is to lengthen the exposure time, but don't go overboard. Setting it to, let's say, 30 seconds will almost certainly result in the lightnings being barely visible in the photos. I usually set to 1 to 6 seconds. Since these are long exposures, you'll need a tripod to keep the camera steady. Avoid makeshift solutions like resting the camera on a car or using beanbags because they'll expose you to rain and increase the risk of camera shake. Also, I suggest to turn off image stabilization so that nothing moves inside the camera while you're taking the shot. It's a good idea to remove the camera strap, too.
Once you've set the exposure time, you can play around with the aperture and ISO sensitivity. The goal is to find a sweet spot between depth of field and noise. The wider the aperture, the shallower the depth of field, and the higher the ISO, the brighter the image but also the more noise. To add more fun to it, the narrow depth of field effect diminishes the lower focal length of your lens is. The exact values all depend on how dark it is. If the lighting conditions are decent, you can start with f/4 and ISO 100. If there's something in the foreground like a tree or car, go down to f/5.6 or even f/8 to keep it sharp. If it's nighttime or the sky is completely covered in clouds, you can crank up the ISO to 2000. Don't try to compensate for low light by increasing the exposure time too much, though. High noise can be easily fixed with software like Adobe Lightroom Classic or Topaz Photo AI, so there's little need to stress about it these days.
Remember to check your photos every now and then! It's best to review them with a histogram. Developing storms often bring denser rain clouds that might not be obvious to the naked eye, especially if they're gradually forming. These clouds can darken the frame and make the earlier shots look way brighter than the later ones.
Focus
Another important part of the puzzle is getting the focus right. Usually, autofocus doesn't work so well in low-light situations, so I'd recommend adjusting it manually. Here are three techniques that can help:
- One way is to temporarily light up the background using a headlamp or car lights, for example. That way, the autofocus mechanism has something to lock on. If it succeeds, we switch the focus back to manual mode and continue taking photos with autofocus disabled.
- The second method is to visually choose a bright point and keep adjusting the focus wheel until that point becomes sharp at maximum magnification in the viewfinder. Personally, I find this method to be the best.
- A way to improve the second method is by using the focus peaking feature, which is available in some camera bodies. It's a visual indicator that shows which objects in the frame are sharp using colored lines and dots.
No matter which method you prefer, I definitely suggest taking a few test shots and quickly zooming in on them to check the focus accuracy and make any necessary adjustments. It's a good idea to repeat this process whenever you change the composition.
Shooting
As I mentioned before, I would probably just forget about using those flash triggers. There are actually two much better and reliable ways to capture photos:
-
The intervalometer. This feature allows you to take photos at set time intervals. It's available in most higher-end models as far as I know. In some older cameras, you might need to use an external gadget. The idea is to set the shortest interval possible and keep taking photos until you decide to stop. But be aware that this solution also has a downside – on my camera, the shortest interval I can set is half a second. To illustrate what this means, let's assume each photo takes 2 seconds to expose. In that case, for every minute of recorded footage, I waste 6 seconds on gaps between photos! Unfortunately, sometimes this is more than enough to miss out on some phenomenal shots.
-
Continuous shooting and a shutter release lock: With this method, you physically lock the shutter to take pictures continuously. In my camera, I can only do this by purchasing a remote shutter release cable, which allows for the locking function. This is the better solution but it's also less convenient, as you have to remember to bring the cable with you. And if you have two camera bodies, you'll need two cables.
Using these techniques, you'll be capturing hundreds, or even thousands, of photos. It might seem overwhelming, but trust me, when you browse through them later, it's quite fast and not a problem at all. On thumbnails, you can instantly see which files have something significant captured, while the rest will just be endless series of boring black or grey mush shots. (Sometimes these make a cool timelapse video.) One thing to keep in mind though is to make sure you have enough memory card capacity. For DSLRs, it's also important to set the camera to work in silent mode; otherwise, you'll need to manually raise and lower the mirror before each shot. This can affect the durability of that part of the camera, especially as you go on more trips.
Shooting in daylight
In my opinion, daytime photography is a lot trickier because lightning bolts are not as visible. But hey, it's not impossible! Those long exposure times that work like magic at night, might end up overexposing your shots and making everything look white during the day. Thankfully, we've got neutral density (ND) filters to save the day. These cool matte filters that look like semi-transparent glass, darken the image by a specific number of stops. I don't have a favorite filter recommendation, but personally, I use the NiSi system which features those fancy graduated filters that I find useful for other purposes. Don't worry if you've got circular filters, they'll do the job just fine too.
I haven't had the chance to use a polarizing filter while capturing stormy moments, so I can't really tell you how it affects the shots.
Dealing with rainfall
First and foremost, we try our best to position ourselves in a way that we're not standing in the rain (again, the radar is an invaluable help). However, in unavoidable situations when we're already getting soaked but still want to take photos, it would be great if our camera had a weather-sealed body and lens. That way, we can rest assured that our gear will stay safe. Regardless, I recommend setting up some sort of rain protection over our setup. It could be a plastic umbrella or the trunk lid of our vehicle. This will help us avoid capturing those pesky raindrops on the front lens. Sometimes they can look cool, but in the long run, having them on every photo gets kind of boring, so it's important how to know how we can deal with them. It's also important to visually check our camera from time to time to ensure everything is okay. If your lens gets covered in a bunch of droplets, just give it a good wipe with a microfiber cloth or blow it off with an electric blower. A classic rubber bulb might not be strong enough for this purpose.
Safety
I am writing about this late, but it does not negate the fact that safety is paramount during photographing and chasing storms. No shot or recording is worth our life or health. In a situation where we're unsure whether or not we're doing something very stupid, it's best to assume that we indeed are, and adjust our actions accordingly ;)
The basic rule when photographing storms is to maintain a safe distance from the point of lightning strikes. 9 out of 10 people survive lightning strikes, but why tempt fate? If we're too close, we don't stand in open spaces. We don't mess with our gear. We sit in a safe shelter that is our car. When lightning gets really close, it's best to pack up quickly and create distance. I couldn't find any data on whether having an open window or door makes a difference if lightning strikes a car, but it certainly wouldn't be good for our eardrums.
If we start feeling a tingling sensation on our skin or our hair stands up, it means the air is getting electrified, and a lightning strike is imminent. We should let go of any metal objects and quickly get into our car. In the event that getting back to the car would take too long, we crouch down and curl up, connecting our feet and covering our ears with our hands.
Another matter, in my opinion the most important one, is safe driving. No matter how much of a rush we're in, we should never engage in crazy races with other drivers on the road. Before the devastating El Reno tornado in 2013 in the US, the only fatalities among storm chasers occurred due to traffic accidents. That statistic is still alarmingly high. We should also not underestimate the distances we travel. When going on a several-hour storm chase at 11:00 PM, we must consider the circumstances under which we will be returning home. The adrenaline may be enough to get us to our destination site, but on the way back, we'll probably be tired and extremely sleepy. This can result in a lack of focus or even falling asleep while driving, which can have, and has had in so many instances, tragic consequences.
Additionally, we must take into account possible damage to the vehicle. Sudden hail may dent the roof of our car, and a branch or, knock on wood, a tree may shatter the front windshield and hurt us directly. For this reason we absolutely avoid stopping under trees.
Last but not least – let's not try to go off-roading in vehicles that aren't meant for it ;) (That's how I've banged up my first car.)
Patience and humility
I'll say it again – storms are unpredictable. Many times, I've gone out and come back with nothing, or maybe just a glimpse of a random bolt between some trees. Perhaps the most frustrating moments come when I find out that the best photo I took in a given month was from a terrace of my own home – that's when I start thinking that maybe these outings are unnecessary, that maybe it's better to just sit on the couch and wait for everything to come to me. But let me tell you, that couldn't be more wrong. Like I said from the start, a successful expedition brings more than just pictures – it delivers immense satisfaction and a huge sense of fulfillment. It's worth it. So, my final tip for all the folks wanting to get into this hobby is to never give up and get off that couch :)
What can be done better
This season, I added a laptop with radar to my setup, and it's making a huge difference in the quality of my storm chasing. But that doesn't mean I've got everything I need just yet :) In the future, I want to:
- Test out a polarizing filter during heavy rainfall to see how it works. I heard it can crank up colors of rainbows!
- Grab a second remote trigger for my other camera body to eliminate those annoying gaps between shots.
- Get an even wider lens, like a 9mm, to make capturing shelf clouds a breeze without having to stitch panoramas later on in the post-processing.
- Invest in a used van with sliding doors so I can set up tripods inside, without having to leave the vehicle and expose myself to avoidable risks.
- Get a laptop with a built-in WWAN and GPS so that I don't have to fiddle with mobile access points and whatnot.
- Familiarize myself better with the area within a 100, 150 km radius to cut down on decision-making during chases.
- More storms and more adventures ;)